How-To:Member: Difference between revisions
(Created page with "Members are what we call users in the ContactsLaw. A member can either be an interactive user who logs into the system, or it can be what we call a service account which is going to be some third party application or integration that talks to the system not in respect of a particular person. The below guide will explain the ways on how we can add new members into the system: 1. Getting Started Navigate to the ribbon group and click on My Subscription. Proceed to the p...") |
No edit summary |
||
| (6 intermediate revisions by 3 users not shown) | |||
| Line 1: | Line 1: | ||
Members | {{DISPLAYTITLE:How to Manage Members}} | ||
In ContactsLaw, "members" refer to the system's users. A member can either be an interactive user who logs into the system or a service account, which is an external application or integration interacting with the system without representing a specific individual. | |||
== 1. Getting Started == | |||
Navigate to the ribbon group and click on ''My Subscription.'' | |||
[[File:Step 1 - Member.png|none|thumb|500x500px]] | |||
Proceed to the pane and click ''Members''. | |||
[[File:Step 2 - Member.png|none|thumb]] | |||
In the grid, you will see a list of all active members who currently have access to the software. Select the desired member. | |||
[[File:Step 3 - Member.png|none|thumb|500x500px]] | |||
== 2. Member Properties == | |||
The '''Member''' section has six (6) parts: Member, Sync, Fields, Documents, Billing, and Performance. | |||
* '''Type''': There are two (2) types of members: Service Accounts and Interactive Users. A service account interacts with the system directly, while an interactive user is always linked to an associated contact. | |||
* '''Display''': Refers to the name of the member. | |||
* '''Client ID''': The identification ID within the system. | |||
* '''Roles''': Determines the member's access level within the system. Common roles include Administrator, User, and Guest. | |||
[[File:Step 4 - Member.png|none|thumb|500x500px]] | |||
'''Sync''' - Sync refers to calendar synchronisation, depending on the individual subscription setup. | |||
* '''Synchronise''' '''using''': ContactsLaw supports synchronisation via Microsoft 365. | |||
* '''Microsoft account:''' The email address associated with the Microsoft 365 account. | |||
* '''Calendar''': Options for syncing calendar or task items, or setting up a two-way sync. | |||
* '''Email''': A scheduled job can automatically import tagged emails into the system. | |||
[[File:Step 5 - Member (Sync).png|none|thumb|500x500px]] | |||
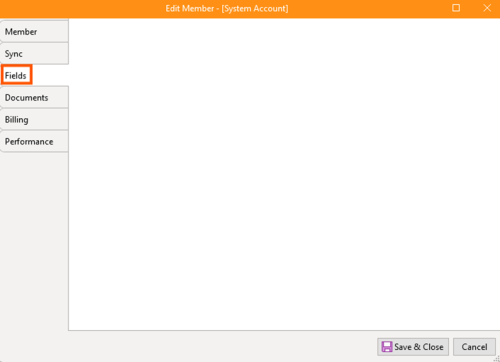
'''Fields''' - Refers to custom fields set up for matters and contacts, enabling custom profile fields for members. | |||
[[File:Step 6 - Member (Fields).png|none|thumb|500x500px]] | |||
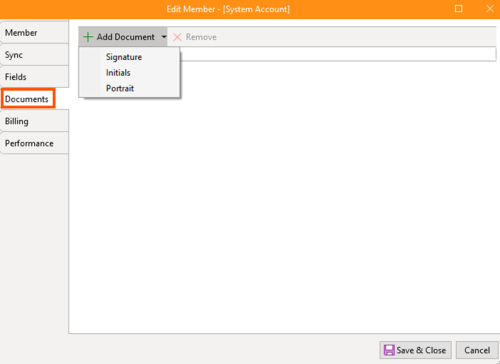
'''Documents''' - This section contains various documents related to members, such as signatures, initials, and portraits. | |||
[[File:Step 7 - Member (Document).png|none|thumb|500x500px]] | |||
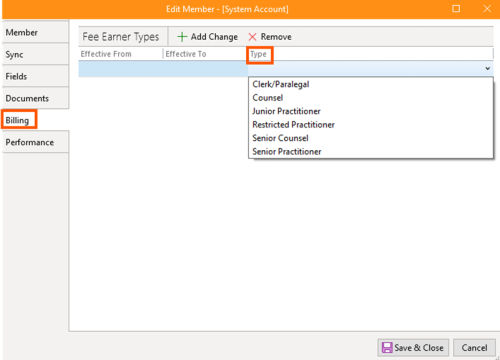
'''Billing'''- Billing refers to time recording rates used for each member. Members are assigned a "Fiona type," which is configured at the subscription level. | |||
[[File:Step 8 - Member (Billing).png|none|thumb|500x500px]] | |||
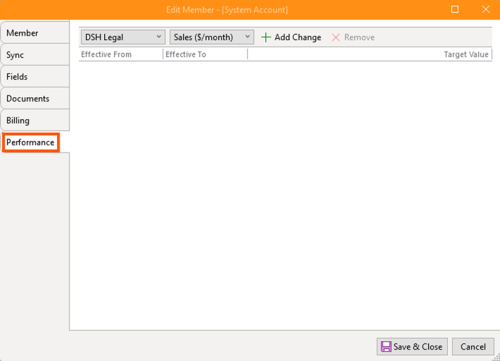
'''Performance''' -This section involves setting performance targets used in performance management and reporting. | |||
[[File:Step 9 - Member (Performance).png|none|thumb|500x500px]] | |||
== 3. Manage Member == | |||
Member management is divided into three (3) categories: | |||
* '''New:''' Create members manually, both interactive users and service accounts. This option is only available to members with administrator roles. [[File:Step 10 - Manage Member (New).png|none|thumb|500x500px]] | |||
* '''View:''' View members who have been marked as inactive in the system.. [[File:Step 11 - Manage Member (View).png|none|thumb|500x500px]] | |||
* '''Actions:''' Edit profile fields for members, an option limited to administrators.[[File:Step 12 - Manage Member (Actions).png|none|thumb|500x500px]] | |||
== 4. Adding New Member == | |||
The following steps explain how to add new members to the ContactsLaw subscription: | |||
* Option 1: Navigate to '''My CPMS ID'''.[[File:Step 13 - CPMS ID.png|none|thumb|500x500px]] | |||
* Click on '''My Subscriptions'''.[[File:Step 14 - CPMS ID Click My Subsricriptions.png|none|thumb|500x500px]] | |||
* Right-click on '''DSH Legal''' and choose '''Manage Users'''[[File:Step 15 - CPMS ID - List of Subscriptions.png|none|thumb|500x500px]] | |||
* Add a new user by entering an email address. [[File:Step 16 - CPMS ID - Manage Users.png|none|thumb|500x500px]] | |||
** Option 2: Return to the ContactsLaw App, navigate to the ribbon group, and select either '''Interactive User''' or '''Service Account'''.[[File:Step 10 - Manage Member (New).png|none|thumb|500x500px]] | |||
== 5. Final Steps == | |||
Before saving the newly created member, ensure a '''CPMS ID''' is provided. | |||
* For '''Option 1''', an invite will be sent to the email address provided. | |||
* For the '''Option 2''', the process of having the CPMS ID number, see separate article about [[CPMS ID]]. | |||
[[File:Step 18 - CPMS ID - Invite User.png|none|thumb|500x500px]] | |||
[[Category:How-To]] | |||
Latest revision as of 23:11, 2 December 2024
In ContactsLaw, "members" refer to the system's users. A member can either be an interactive user who logs into the system or a service account, which is an external application or integration interacting with the system without representing a specific individual.
1. Getting Started
Navigate to the ribbon group and click on My Subscription.
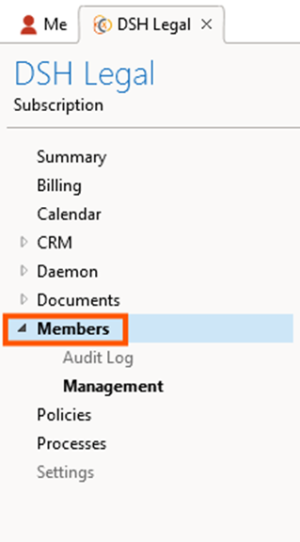
Proceed to the pane and click Members.
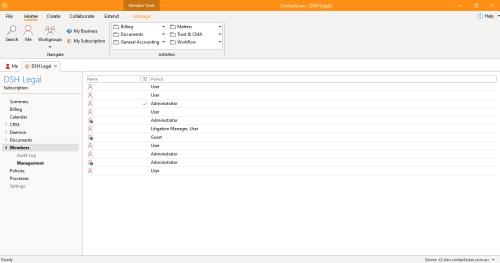
In the grid, you will see a list of all active members who currently have access to the software. Select the desired member.
2. Member Properties
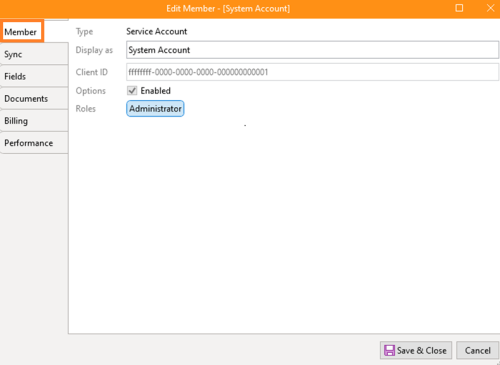
The Member section has six (6) parts: Member, Sync, Fields, Documents, Billing, and Performance.
- Type: There are two (2) types of members: Service Accounts and Interactive Users. A service account interacts with the system directly, while an interactive user is always linked to an associated contact.
- Display: Refers to the name of the member.
- Client ID: The identification ID within the system.
- Roles: Determines the member's access level within the system. Common roles include Administrator, User, and Guest.
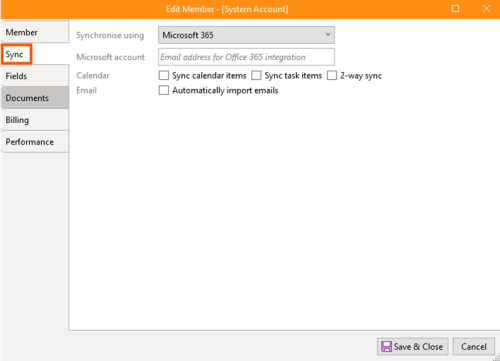
Sync - Sync refers to calendar synchronisation, depending on the individual subscription setup.
- Synchronise using: ContactsLaw supports synchronisation via Microsoft 365.
- Microsoft account: The email address associated with the Microsoft 365 account.
- Calendar: Options for syncing calendar or task items, or setting up a two-way sync.
- Email: A scheduled job can automatically import tagged emails into the system.
Fields - Refers to custom fields set up for matters and contacts, enabling custom profile fields for members.
Documents - This section contains various documents related to members, such as signatures, initials, and portraits.
Billing- Billing refers to time recording rates used for each member. Members are assigned a "Fiona type," which is configured at the subscription level.
Performance -This section involves setting performance targets used in performance management and reporting.
3. Manage Member
Member management is divided into three (3) categories:
- New: Create members manually, both interactive users and service accounts. This option is only available to members with administrator roles.
- View: View members who have been marked as inactive in the system..
- Actions: Edit profile fields for members, an option limited to administrators.
4. Adding New Member
The following steps explain how to add new members to the ContactsLaw subscription:
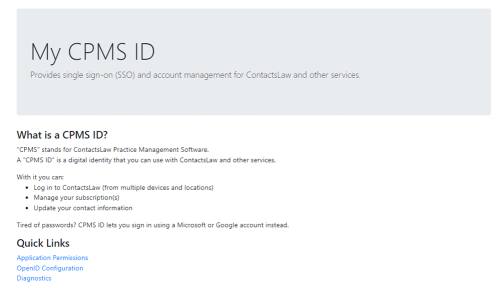
- Option 1: Navigate to My CPMS ID.
- Click on My Subscriptions.
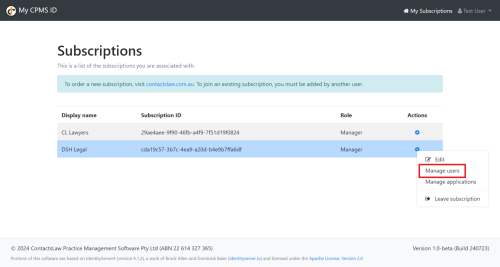
- Right-click on DSH Legal and choose Manage Users
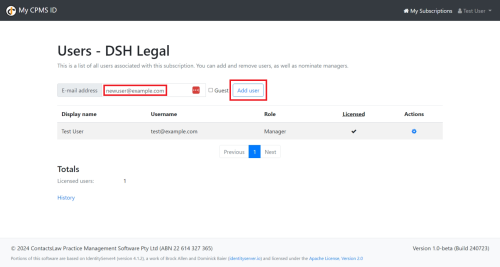
- Add a new user by entering an email address.
- Option 2: Return to the ContactsLaw App, navigate to the ribbon group, and select either Interactive User or Service Account.
5. Final Steps
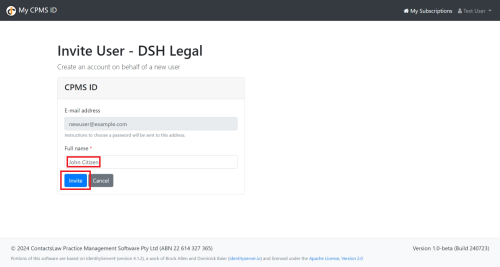
Before saving the newly created member, ensure a CPMS ID is provided.
- For Option 1, an invite will be sent to the email address provided.
- For the Option 2, the process of having the CPMS ID number, see separate article about CPMS ID.


