How-To:Brief: Difference between revisions
No edit summary |
No edit summary |
||
| (13 intermediate revisions by 3 users not shown) | |||
| Line 1: | Line 1: | ||
{{DISPLAYTITLE:How to Create Briefs}} | |||
[[Brief|Briefs]] are an essential tool for organising and referencing documents in legal contexts, such as affidavits or tables of contents. In this guide, we will explain how they work, and how to create and manage them effectively. | |||
== 1. Getting Started == | |||
Select the ''Home'' tab on the ribbon and, under ''Documents'', click ''Create Brief'' | |||
[[File:Step 1.2 - Brief Document.png|none|thumb|500x500px|Getting Started]] | |||
== 2. Add Documents to the Brief == | |||
Select the documents you want to include in the brief. You can do this by: | |||
* Dragging and dropping the documents | |||
* Using the copy-paste method | |||
* Adding documents via the search function | |||
Ensure that all necessary documents for the brief are identified.[[File:Step 3 - Brief Document1.png|none|thumb|500x500px|Add Documents to the Brief]] | |||
* | == 3. Configure Brief Settings == | ||
* | * '''Matter''': Confirm that the brief is associated with the correct matter. | ||
* | * '''Description''': Summarise the purpose and key points of the brief. | ||
* '''Document Labelling''': Choose how to label the documents: | |||
** '''Document Number''': An internal reference number unique to the system. | |||
** '''Historical Code''': A reference code from a legacy system or another source. | |||
** '''Brief-Specific Reference''': A unique reference for the brief only. | |||
** '''Auto-Numbering''': Automatically assign sequential numbers to documents with optional prefixes. | |||
*'''Template''': Select a pre-configured template to standardise the brief's layout and structure. | |||
[[File:Step 3.2 - Labelling.png|none|thumb|500x500px|Configure Brief Settings]] | |||
== 4. Arrange Documents == | |||
* '''Sort Order''': Select how the documents should be ordered: | |||
** Custom order (manually drag and rearrange documents). | |||
** By document number. | |||
** By date. | |||
* '''First Page Number''': Specify the starting page number if the brief will be inserted into an existing document. | |||
* '''Template Configuration''': Choose which [[Document Template|template]] to use when the brief is finalised. | |||
[[File:Step 3.3 - Order.png|none|thumb|500x500px|Arrange documents by order]] | |||
== 5. Finalising the Brief == | |||
* '''Generate the Brief''': Once all settings are configured, finalise the brief to generate the document. | |||
* '''Review and Edit''': Open the generated document to review. You can add additional content and make necessary changes. | |||
* '''Save and Draft States''': Briefs can exist in draft or final states. Once finalised, you cannot make changes to the documents in the brief. However, you can redraft if needed. | |||
[[File:Finalising the Brief.png|none|thumb|500x500px|Finalising the brief]] | |||
[[File: | |||
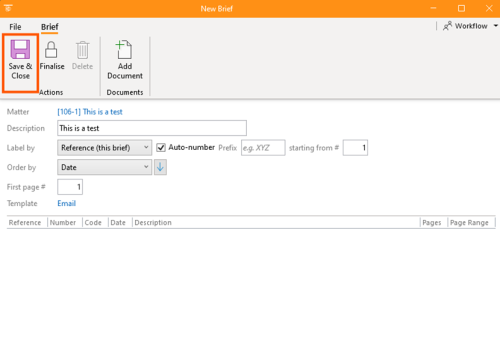
[[File:Step 4 - Brief Document.png|none|thumb|500x500px|<br />Save & Close]] | |||
[[File:Step | |||
== Advanced Features == | |||
* '''Hierarchical Arrangement''': Arrange documents hierarchically, useful for grouping emails with their attachments. | * '''Hierarchical Arrangement''': Arrange documents hierarchically, useful for grouping emails with their attachments. | ||
* '''Templates''': Use different brief templates for various purposes to streamline the document creation process. | * '''Templates''': Use different brief templates for various purposes to streamline the document creation process. | ||
Briefs are powerful tools for organising and referencing documents in legal matters. By following the steps outlined above, you can create, manage, and finalise briefs efficiently, ensuring all your documents are well-organised and easily accessible. | |||
[[Category:How-To]] | [[Category:How-To]] | ||
[[Category:Documents]] | |||
Latest revision as of 23:15, 2 December 2024
Briefs are an essential tool for organising and referencing documents in legal contexts, such as affidavits or tables of contents. In this guide, we will explain how they work, and how to create and manage them effectively.
1. Getting Started
Select the Home tab on the ribbon and, under Documents, click Create Brief
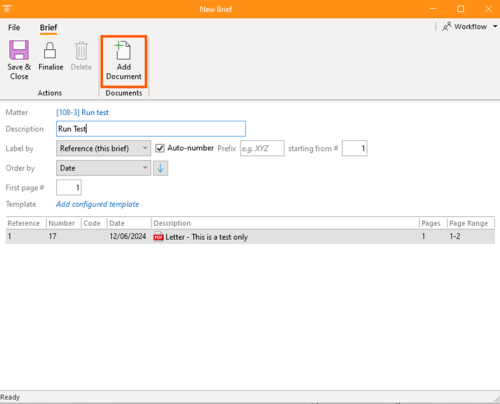
2. Add Documents to the Brief
Select the documents you want to include in the brief. You can do this by:
- Dragging and dropping the documents
- Using the copy-paste method
- Adding documents via the search function
Ensure that all necessary documents for the brief are identified.
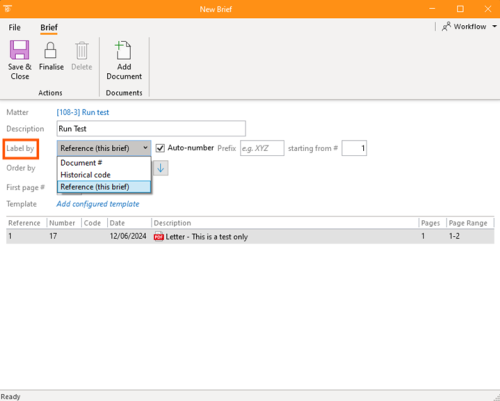
3. Configure Brief Settings
- Matter: Confirm that the brief is associated with the correct matter.
- Description: Summarise the purpose and key points of the brief.
- Document Labelling: Choose how to label the documents:
- Document Number: An internal reference number unique to the system.
- Historical Code: A reference code from a legacy system or another source.
- Brief-Specific Reference: A unique reference for the brief only.
- Auto-Numbering: Automatically assign sequential numbers to documents with optional prefixes.
- Template: Select a pre-configured template to standardise the brief's layout and structure.
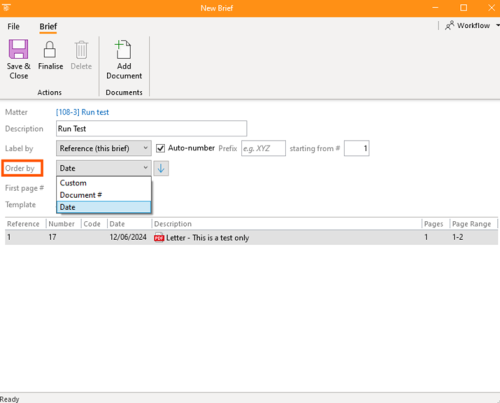
4. Arrange Documents
- Sort Order: Select how the documents should be ordered:
- Custom order (manually drag and rearrange documents).
- By document number.
- By date.
- First Page Number: Specify the starting page number if the brief will be inserted into an existing document.
- Template Configuration: Choose which template to use when the brief is finalised.
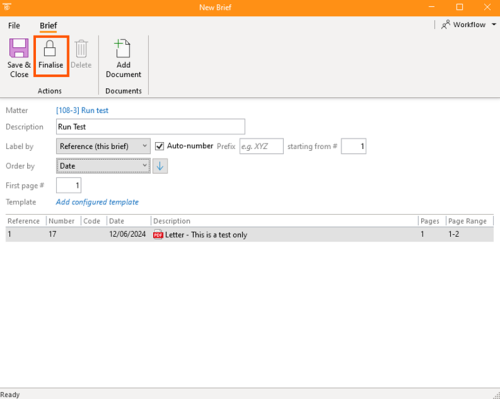
5. Finalising the Brief
- Generate the Brief: Once all settings are configured, finalise the brief to generate the document.
- Review and Edit: Open the generated document to review. You can add additional content and make necessary changes.
- Save and Draft States: Briefs can exist in draft or final states. Once finalised, you cannot make changes to the documents in the brief. However, you can redraft if needed.
Advanced Features
- Hierarchical Arrangement: Arrange documents hierarchically, useful for grouping emails with their attachments.
- Templates: Use different brief templates for various purposes to streamline the document creation process.
Briefs are powerful tools for organising and referencing documents in legal matters. By following the steps outlined above, you can create, manage, and finalise briefs efficiently, ensuring all your documents are well-organised and easily accessible.


