How-To:Create Document: Difference between revisions
No edit summary |
No edit summary |
||
| (3 intermediate revisions by 2 users not shown) | |||
| Line 1: | Line 1: | ||
{{DISPLAYTITLE:How to Create Documents}} | |||
Documents (including emails, letters and other documents) are created within ContactsLaw using templates/precedents within the system. There are three convenient entry-points into document creation: | |||
== | == 1. Getting Started == | ||
To create a new document: | |||
* Option 1: Select the ''Home'' tab on the ribbon and, under ''Documents'', click ''Create Document.'' [[File:Step 1 - Create Document.png|none|thumb|500x500px|[[File:Step 1.1 - Create Document.png|none|thumb|500x500px]]Creating a template using the "Home" tab on the Documents dropdown.]] | |||
*Entry-point 2: Under the "''Create''" tab on the ribbon, click ''New Document.''[[File:Creating Document - Letter B option.png|none|thumb|500x500px|Creating a new document using the "Create" tab on the ribbon.]] | |||
*Option 3: From either a workgroup tab or the subscription tab, select ''Documents'' from the navigation pane and choose the ''All Documents'' view. Click ''New Document''.[[File:Creating Document - Letter C option.png|none|thumb|600x600px|Creating a new document from the "Documents" view of a workgroup.]] | |||
== 2. Specify Options == | |||
Each entry point will open the "'''New Document'''" Window | |||
* '''Destination''' - where the document can be stored. Documents can be stored against a Contact, a Matter or a Workgroup | |||
* '''Workgroup''' - get a list of templates available in that workgroup. (e.g Court Actions, Court Actions - Magistrates Court (WA), Demo Workgroup, Litigation, Probate, Wills) | |||
* '''Template''' - where you want to generate the document from.The drop-down allows you to filter the templates by particular types (e.g. Letter, SMS. You can also filter by typing into the search window. | |||
* '''Options:''' Indicates that the new document will be uploaded to the system, and is open for editing. | |||
[[File:Step 4.1 - Create Document.png|none|thumb|500x500px|Naming and specifying options for a new document.]] | |||
== 3. Add Custom Details == | |||
The below window is effectively the opportunity to insert the custom details into the template: | |||
* '''Folder:''' This is the folder in which the document will appear. If there is no folder by that name, one will be created. | |||
* '''Parties:''' These are the contacts associated with the document (e.g. author and addressee of a letter). Where an associated entity is relevant, this can be selected. | |||
* '''Description:''' This will become the name of the document in ContactsLaw. The description will often pre-build based on the above settings and will re-generate if the settings are changed. To stop this occurring, you can click the lock button to the right-side. | |||
* '''Attributes:''' "Discoverable" is an attribute that allows you to sort by discoverable and non-discoverable documents in the system. "Pinned" allows you to display the document at the top of the window in a document list, notwithstanding the other sorting criteria (e.g. date). | |||
[[File:Step 5 - Create Document.png|none|thumb|500x500px|Cataloguing information for a new document.]] | |||
== 4. Final Steps == | |||
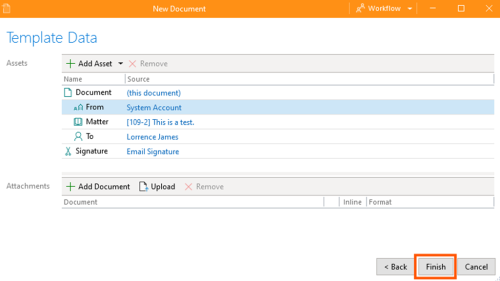
The below window will then give you a summary of the assets upon which the template is drawing on for data to pre-fill the document. It is an opportunity for you to review and make any changes. | |||
Attachments - add or upload a document | |||
When you are finished, click the ''Finish'' button.[[File:Step 5.1 - Create Document.png|none|thumb|500x500px|Adding new assets and attachments to a new document.]] | |||
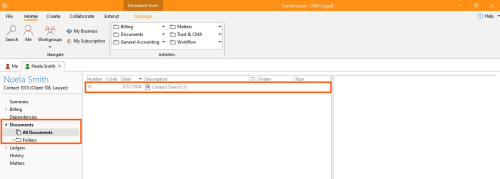
You can find the document you created in the destination you selected during document creation.[[File:Step 6 - Create Document.png|none|thumb|500x500px|New document destination.]] | |||
[[Category:How-To]] | [[Category:How-To]] | ||
Latest revision as of 23:19, 2 December 2024
Documents (including emails, letters and other documents) are created within ContactsLaw using templates/precedents within the system. There are three convenient entry-points into document creation:
1. Getting Started
To create a new document:
- Option 1: Select the Home tab on the ribbon and, under Documents, click Create Document.
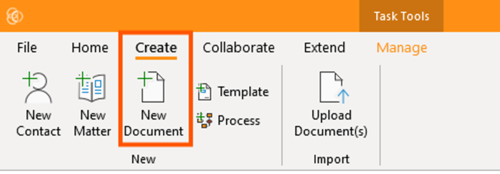
- Entry-point 2: Under the "Create" tab on the ribbon, click New Document.
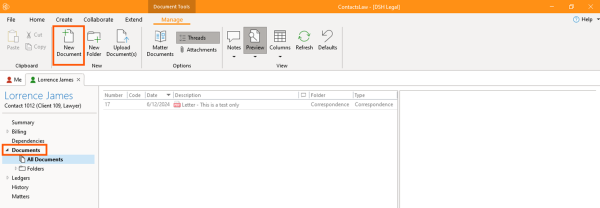
- Option 3: From either a workgroup tab or the subscription tab, select Documents from the navigation pane and choose the All Documents view. Click New Document.
2. Specify Options
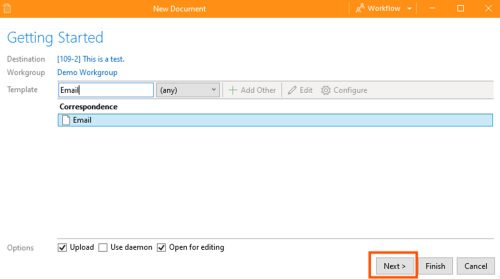
Each entry point will open the "New Document" Window
- Destination - where the document can be stored. Documents can be stored against a Contact, a Matter or a Workgroup
- Workgroup - get a list of templates available in that workgroup. (e.g Court Actions, Court Actions - Magistrates Court (WA), Demo Workgroup, Litigation, Probate, Wills)
- Template - where you want to generate the document from.The drop-down allows you to filter the templates by particular types (e.g. Letter, SMS. You can also filter by typing into the search window.
- Options: Indicates that the new document will be uploaded to the system, and is open for editing.
3. Add Custom Details
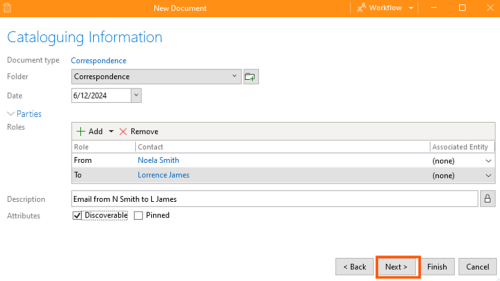
The below window is effectively the opportunity to insert the custom details into the template:
- Folder: This is the folder in which the document will appear. If there is no folder by that name, one will be created.
- Parties: These are the contacts associated with the document (e.g. author and addressee of a letter). Where an associated entity is relevant, this can be selected.
- Description: This will become the name of the document in ContactsLaw. The description will often pre-build based on the above settings and will re-generate if the settings are changed. To stop this occurring, you can click the lock button to the right-side.
- Attributes: "Discoverable" is an attribute that allows you to sort by discoverable and non-discoverable documents in the system. "Pinned" allows you to display the document at the top of the window in a document list, notwithstanding the other sorting criteria (e.g. date).
4. Final Steps
The below window will then give you a summary of the assets upon which the template is drawing on for data to pre-fill the document. It is an opportunity for you to review and make any changes.
Attachments - add or upload a document
When you are finished, click the Finish button.
You can find the document you created in the destination you selected during document creation.


