How-To:Invoice: Difference between revisions
(revised and added new screenshots) |
No edit summary |
||
| (11 intermediate revisions by 4 users not shown) | |||
| Line 1: | Line 1: | ||
{{DISPLAYTITLE:How to Create Invoices}} | |||
ContactsLaw simplifies invoicing by automating essential tasks, such as pre-filling invoice fields based on client data and quotes, applying rate scales, and managing tax calculations like GST. The software also offers customisable templates for professional invoices and allows users to set payment due dates, interest accrual, and cut-off dates for billable items. Advanced features like trust transfers, solution-based billing, and automated document production further enhance the efficiency of financial processes, reducing administrative burdens and improving accuracy within legal practices. | |||
1.''' | == 1. Getting Started == | ||
* Select the ''Home'' tab on the ribbon a<nowiki/>nd, under ''Billing'', click ''Create Invoice''[[File:Step 2 - Create Invoice.png|none|thumb|500x500px]] | |||
== 2. Enter Invoice Details == | |||
* '''Invoice Date:''' Enter the date you want to appear on the printed invoice. | |||
* '''Due Date:''' Specify the date by which payment must be made. By default, this is set to 14 days after the invoice date, but you can adjust it as needed. | |||
* '''Interest Accrual Date:''' Set the date from which interest will start accruing. This can be the same as the due date or a different date if you wish to allow a grace period. | |||
* '''Invoice Date:''' Enter the date to appear on the printed invoice. | |||
* '''Due Date:''' | |||
* '''Interest Accrual Date:''' Set the date | |||
[[File:Step 2 - Create an Invoice.png|none|thumb|500x500px]] | [[File:Step 2 - Create an Invoice.png|none|thumb|500x500px]] | ||
'''Set Billing Contact''' | |||
* The default billing contact (the person to whom the invoice is addressed to) is set to the client associated with the matter. The contact can be changed on the window as needed. | |||
* The billing contact | |||
[[File:Step 3 - Create an Invoice.png|none|thumb|500x500px]] | [[File:Step 3 - Create an Invoice.png|none|thumb|500x500px]] | ||
'''Billing Options''' | |||
* '''Quote:''' If the invoice is based on a quote, select this option to automatically pre-fill the relevant items. If not, proceed to build the invoice manually. | |||
* '''Rate Scale:''' Select the appropriate rate scale to apply, based on the rates effective as of the current date or another specified date. | |||
* '''Quote:''' If the invoice is based on a quote, select | * '''Cut-Off Date:''' Set the cut-off date for including items in the invoice. For instance, this could be set to include charges up to the day preceding the invoice date. | ||
* '''Rate Scale:''' | * '''GST:''' Determine whether GST (Goods and Services Tax) should be applied. If GST is not applicable, adjust the amounts to reflect zero. | ||
* '''Cut-Off Date:''' Set the cut-off date for including items in the invoice. For | |||
* '''GST:''' | |||
[[File:Step 4 - Create an Invoice.png|none|thumb|500x500px]] | [[File:Step 4 - Create an Invoice.png|none|thumb|500x500px]] | ||
'''Select an Invoice Template''' | |||
* Choose an appropriate template to format the invoice. If no template is available, add one later. This template will generate a printable document linked to the invoice. | * Choose an appropriate template to format the invoice. If no template is available, add one later. This template will generate a printable document linked to the invoice. | ||
[[File:Step 5 | [[File:Step 5 - Create an Invoice.png|none|thumb|500x500px]] | ||
* '''Products:''' Include products | == 3. Add Invoice Items == | ||
* '''Custom Items:''' Add any | * '''Products:''' Include products, such as groupings of time or fixed charges. Adjust the quantities and rates as necessary to ensure accurate billing. | ||
* '''Discounts:''' Apply discounts as a fixed amount or a percentage of the total invoice. | * '''Custom Items:''' Add any additional billable items with a custom description, such as photocopying charges or other miscellaneous expenses. | ||
* '''Discounts:''' Apply discounts either as a fixed amount or as a percentage of the total invoice, depending on the terms agreed upon. | |||
[[File:Step 6 - Create an Invoice.png|none|thumb|500x500px]] | [[File:Step 6 - Create an Invoice.png|none|thumb|500x500px]] | ||
[[File:Step 7 - Create an Invoice.png|none|thumb|500x500px]] | |||
== 4. Review and Finalise == | |||
* Save the invoice as a draft if further revisions are required. | |||
* Save the invoice as a draft if further | * Finalise the invoice to post it to the general ledger. The invoice will become uneditable. | ||
* Finalise the invoice to post it to the general ledger | * Finalising will also generate a document and link the invoice record to that document. | ||
* Finalising will generate and link the invoice document | |||
[[File:Step 7 - Create an Invoice.png|none|thumb|500x500px]] | [[File:Step 7 - Create an Invoice.png|none|thumb|500x500px]] | ||
== 5. Print, Send, or Export Invoice == | |||
* '''Print:''' Use the selected template to print the invoice document. | |||
* '''Send:''' Create a covering email with the invoice attached, addressed to the billing contact. | |||
* '''Print:''' | * '''Export:''' Downloads a local copy of the invoice. | ||
* '''Send:''' | |||
* '''Export:''' | |||
[[File:Step 8 - Create an Invoice.png|none|thumb|500x500px]] | [[File:Step 8 - Create an Invoice.png|none|thumb|500x500px]] | ||
== 6. Trust Transfer == | |||
* If applicable, proceed to the trust transfer section. | |||
* Enter the transfer date, trust balance, and the amount to be transferred. Review the balance post-transfer. | |||
* If applicable, | * Attach any required authorisation documents. This will permanently link the document to the transfer, simplifying subsequent audits. | ||
* Enter the transfer date, trust balance, and | |||
* | |||
[[File:Step 9 - Create an Invoice.png|none|thumb|500x500px]] | [[File:Step 9 - Create an Invoice.png|none|thumb|500x500px]] | ||
== Additional Features == | |||
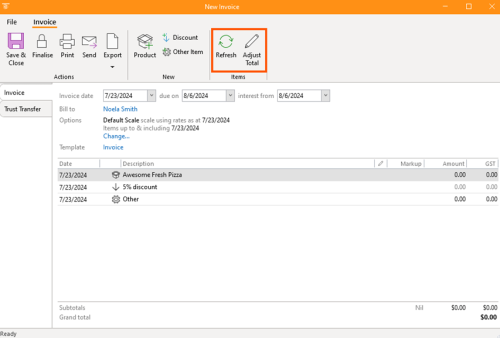
* Use the ''Refresh'' button to update invoice amounts - this is useful if there are changes to time records or other details while editing a draft invoice. | |||
* Use the total button to round the invoice total to a specific amount. This automatically adjusts the individual item amounts proportionally to produce the desired total. | |||
* Use the | |||
* Use the total button to round the invoice total to a specific amount | |||
[[File:Step 10 - Create an Invoice.png|none|thumb|500x500px]] | [[File:Step 10 - Create an Invoice.png|none|thumb|500x500px]] | ||
[[Category:How-To]] | [[Category:How-To]] | ||
Latest revision as of 23:19, 2 December 2024
ContactsLaw simplifies invoicing by automating essential tasks, such as pre-filling invoice fields based on client data and quotes, applying rate scales, and managing tax calculations like GST. The software also offers customisable templates for professional invoices and allows users to set payment due dates, interest accrual, and cut-off dates for billable items. Advanced features like trust transfers, solution-based billing, and automated document production further enhance the efficiency of financial processes, reducing administrative burdens and improving accuracy within legal practices.
1. Getting Started
- Select the Home tab on the ribbon and, under Billing, click Create Invoice
2. Enter Invoice Details
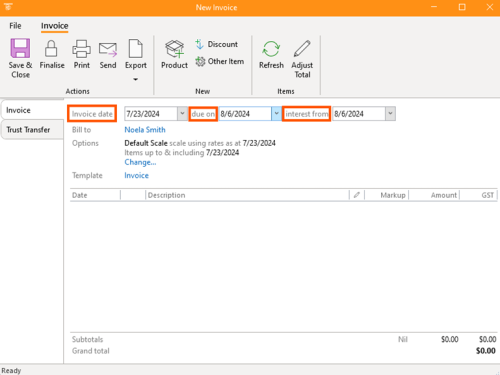
- Invoice Date: Enter the date you want to appear on the printed invoice.
- Due Date: Specify the date by which payment must be made. By default, this is set to 14 days after the invoice date, but you can adjust it as needed.
- Interest Accrual Date: Set the date from which interest will start accruing. This can be the same as the due date or a different date if you wish to allow a grace period.
Set Billing Contact
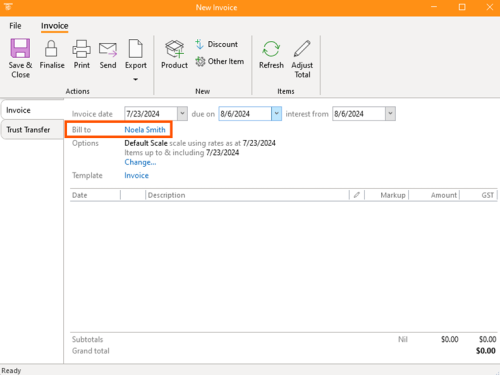
- The default billing contact (the person to whom the invoice is addressed to) is set to the client associated with the matter. The contact can be changed on the window as needed.
Billing Options
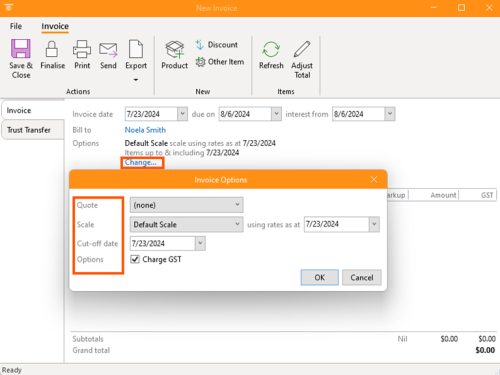
- Quote: If the invoice is based on a quote, select this option to automatically pre-fill the relevant items. If not, proceed to build the invoice manually.
- Rate Scale: Select the appropriate rate scale to apply, based on the rates effective as of the current date or another specified date.
- Cut-Off Date: Set the cut-off date for including items in the invoice. For instance, this could be set to include charges up to the day preceding the invoice date.
- GST: Determine whether GST (Goods and Services Tax) should be applied. If GST is not applicable, adjust the amounts to reflect zero.
Select an Invoice Template
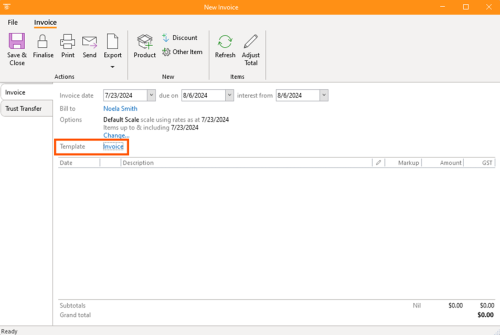
- Choose an appropriate template to format the invoice. If no template is available, add one later. This template will generate a printable document linked to the invoice.
3. Add Invoice Items
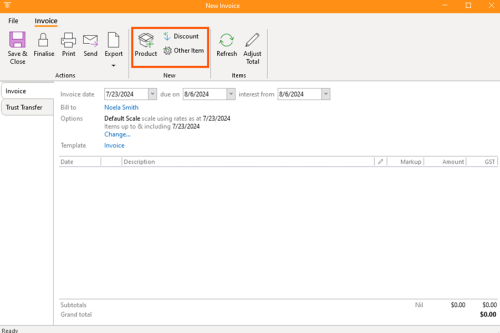
- Products: Include products, such as groupings of time or fixed charges. Adjust the quantities and rates as necessary to ensure accurate billing.
- Custom Items: Add any additional billable items with a custom description, such as photocopying charges or other miscellaneous expenses.
- Discounts: Apply discounts either as a fixed amount or as a percentage of the total invoice, depending on the terms agreed upon.
4. Review and Finalise
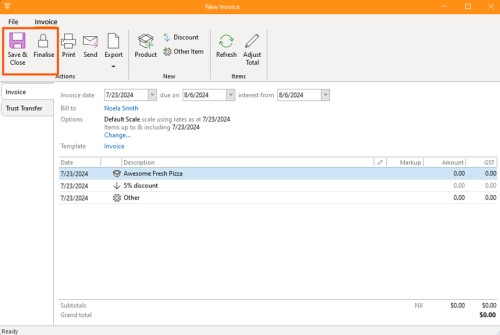
- Save the invoice as a draft if further revisions are required.
- Finalise the invoice to post it to the general ledger. The invoice will become uneditable.
- Finalising will also generate a document and link the invoice record to that document.
5. Print, Send, or Export Invoice
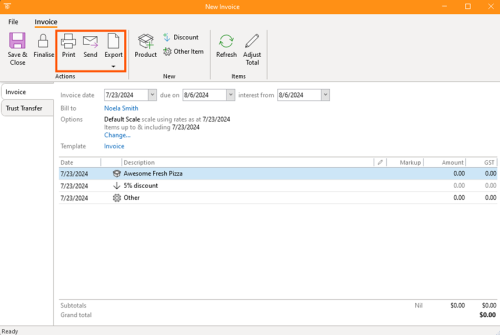
- Print: Use the selected template to print the invoice document.
- Send: Create a covering email with the invoice attached, addressed to the billing contact.
- Export: Downloads a local copy of the invoice.
6. Trust Transfer
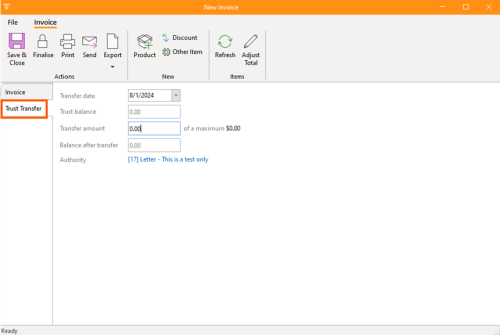
- If applicable, proceed to the trust transfer section.
- Enter the transfer date, trust balance, and the amount to be transferred. Review the balance post-transfer.
- Attach any required authorisation documents. This will permanently link the document to the transfer, simplifying subsequent audits.
Additional Features
- Use the Refresh button to update invoice amounts - this is useful if there are changes to time records or other details while editing a draft invoice.
- Use the total button to round the invoice total to a specific amount. This automatically adjusts the individual item amounts proportionally to produce the desired total.


