How-To:Matter: Difference between revisions
(Created page with "How to create a “New Matter” 1. Open the app and navigate to "Create", then click on "New Matter". 2. Add a client and liaison, and select a workgroup. Also, specify the matter type (Prospect, Client, or Administration) as needed. Then click “Next”. 3. Add member roles (required) ,description and client’s reference (optional). Then click “Finish” 4. You will be directed to the matter tools page, where you can view and manage all details related to the m...") |
No edit summary |
||
| (7 intermediate revisions by 3 users not shown) | |||
| Line 1: | Line 1: | ||
How to create a | {{DISPLAYTITLE:How to Create Matters}} | ||
== 1. Getting Started == | |||
To create a new matter: | |||
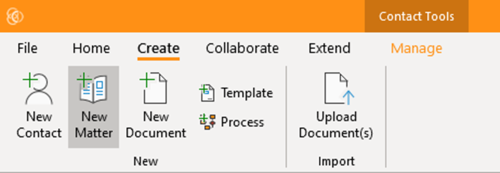
* Under the "''Create''" tab on the ribbon, click ''New Matter''. | |||
[[File:Step 1 - Matters.png|none|thumb|500x500px]] | |||
== 2. Enter Matter Details == | |||
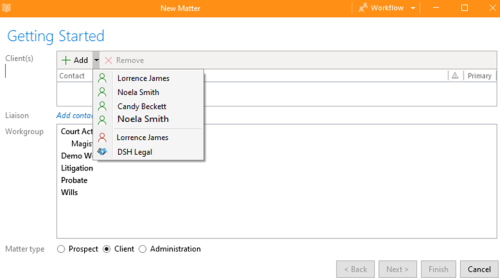
'''Client:''' Add the primary client. If the client is an entity, you must also add a Liaison. | |||
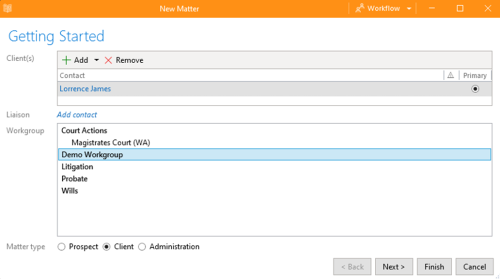
4. You will be directed to the | '''Workgroup:''' Select a Workgroup to determine the available templates and settings. | ||
'''Matter Type:''' Specify the Matter Type as ''Prospect, Client, or Administration'', depending on your needs.[[File:Step 2.1 - Matters.png|none|thumb|500x500px|Enter matter details]] | |||
[[File:Step 2.2 - Matters.png|none|thumb|500x500px|Enter workgroup type]] | |||
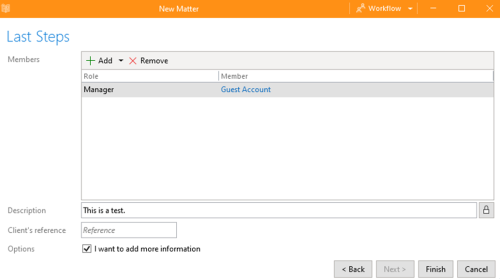
3. Add Custom Details'''Member Roles:''' Assign roles based on the selected Workgroup. These roles are required for document processing. | |||
'''Description:''' Enter the Matter name to provide context for the document. | |||
'''Client’s Reference:''' (Optional) Include a reference number or code provided by the client for additional identification. | |||
If you wish to add more information immediately, select "I want to add more information" to open the Matter editor.[[File:Step 3 - Matters.png|none|thumb|500x500px]] | |||
== 4. Final Steps == | |||
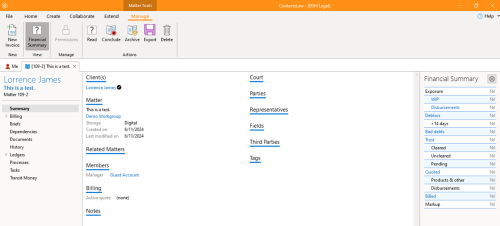
You will be directed to the Matter summary window, where you can view and manage all related details, including related matters, financial summaries, and an overview of the matter's specifics. | |||
[[File:Step 4 - Matters.png|none|thumb|500x500px]] | |||
[[Category:How-To]] | |||
Latest revision as of 23:20, 2 December 2024
1. Getting Started
To create a new matter:
- Under the "Create" tab on the ribbon, click New Matter.
2. Enter Matter Details
Client: Add the primary client. If the client is an entity, you must also add a Liaison.
Workgroup: Select a Workgroup to determine the available templates and settings.
Matter Type: Specify the Matter Type as Prospect, Client, or Administration, depending on your needs.
3. Add Custom DetailsMember Roles: Assign roles based on the selected Workgroup. These roles are required for document processing.
Description: Enter the Matter name to provide context for the document.
Client’s Reference: (Optional) Include a reference number or code provided by the client for additional identification.
If you wish to add more information immediately, select "I want to add more information" to open the Matter editor.
4. Final Steps
You will be directed to the Matter summary window, where you can view and manage all related details, including related matters, financial summaries, and an overview of the matter's specifics.


