How-To:Upload Document: Difference between revisions
No edit summary |
No edit summary |
||
| Line 1: | Line 1: | ||
Uploading a document to ContactsLaw describes the process of bringing a document from outside the software into the system. Documents can be uploaded manually or cofigured to upload automatically (e.g. through certain Microsoft Outlook server installations). | |||
The below guide considers uploading documents manually into ContactsLaw. | |||
# | # The "Upload Doucment(s)" button appears in the ribbon under the "Create" tab. Alternatively, the Upload Document(s) window can be opened by dragging and dropping a document into ContactsLaw.[[File:Step 3 - Uploading by Software.png|none|thumb|500x500px]] | ||
# '''Browse for Documents:''' A browse panel will open, allowing you to locate documents on your local PC. You can also drag and drop documents into this window.[[File:Step 4.1 - Uploading by Software.png|none|thumb|500x500px]]'''5. Handle Attachments:''' By default, the extract feature separates attachments into individual items. If you don’t want them extracted, turn off the extract option. You can also manually extract attachments.[[File:Step 4.3 - Uploading by Software.png|none|thumb|500x500px]]'''6. Set Destination:''' Choose where the document will reside | # '''Browse for Documents:''' A browse panel will open, allowing you to locate documents on your local PC. You can also drag and drop documents into this window.[[File:Step 4.1 - Uploading by Software.png|none|thumb|500x500px]]'''5. Handle Attachments:''' By default, the extract feature separates attachments into individual items. If you don’t want them extracted, turn off the extract option before putting the document into this window. You can also manually extract attachments.[[File:Step 4.3 - Uploading by Software.png|none|thumb|500x500px]]'''6. Set Destination:''' Choose where the document will reside. The destination can be a Matter, a Contact or a Workgroup.[[File:Step 6.1 - Uploading by Software.png|none|thumb|500x500px|[[File:Step 6.2 - Uploading by Software.png|none|thumb|500x500px]][[File:Step 6.3 - Uploading by Software.png|none|thumb|500x500px]]Use the search function to select the appropriate destination. This determines the document's permissions. Choose a storage location if needed. Most practices will use the default location.[[File:Step 6.4 - Uploading by Software.png|none|thumb|500x500px]]]]7. '''Choose Document Type:''' | ||
#* You can select a document type | #* You can select a document type for each document. | ||
#* If the document type doesn’t require additional information, the document will be catalogued automatically. | #* If the document type doesn’t require additional information, the document will be catalogued automatically. | ||
#* You can also defer choosing a document type until later. [[File:Step 6.5 - Uploading by Software.png|none|thumb|500x500px]]8. '''Upload and Process:''' Click "'''Upload'''." The upload window will minimise, processing items in the background. You can continue working while the documents upload. | #* You can also defer choosing a document type until later ("choose later"). [[File:Step 6.5 - Uploading by Software.png|none|thumb|500x500px]]8. '''Upload and Process:''' Click "'''Upload'''." The upload window will minimise, processing items in the background. You can continue working while the documents upload. The "Delete original document(s)" will delete the document from its original location. | ||
[[Category:How-To]] | [[Category:How-To]] | ||
Revision as of 12:39, 13 July 2024
Uploading a document to ContactsLaw describes the process of bringing a document from outside the software into the system. Documents can be uploaded manually or cofigured to upload automatically (e.g. through certain Microsoft Outlook server installations).
The below guide considers uploading documents manually into ContactsLaw.
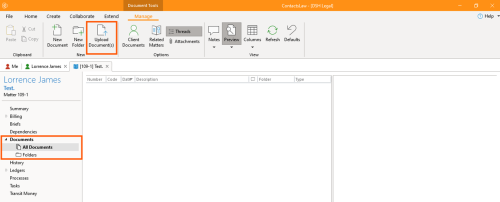
- The "Upload Doucment(s)" button appears in the ribbon under the "Create" tab. Alternatively, the Upload Document(s) window can be opened by dragging and dropping a document into ContactsLaw.
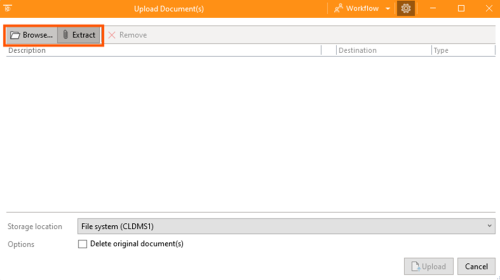
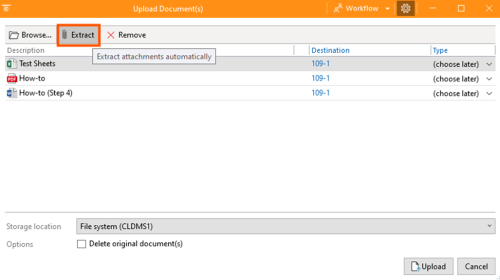
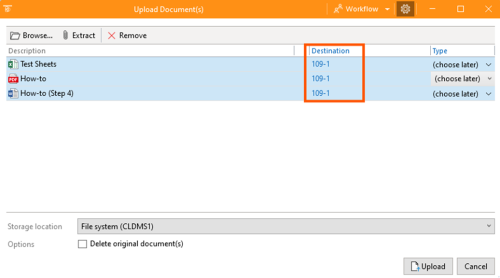
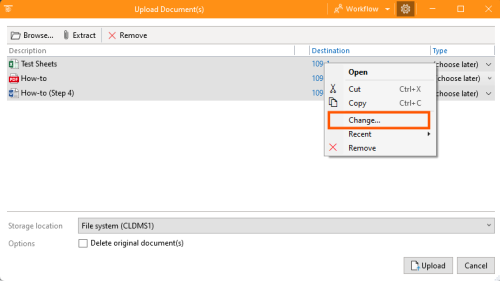
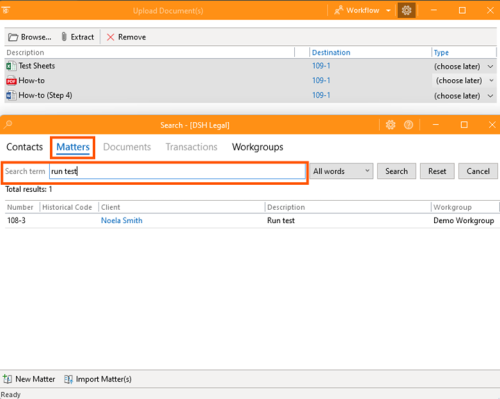
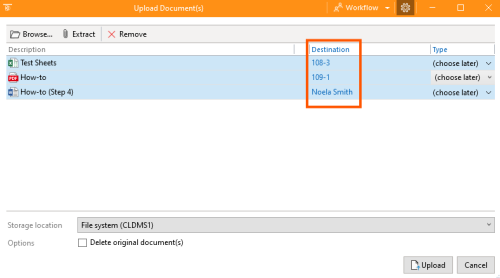
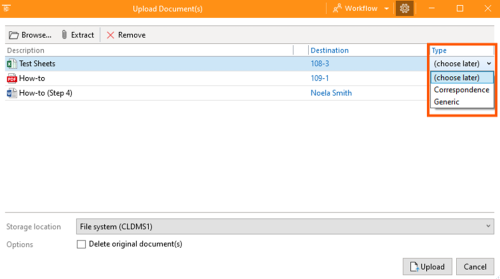
- Browse for Documents: A browse panel will open, allowing you to locate documents on your local PC. You can also drag and drop documents into this window.5. Handle Attachments: By default, the extract feature separates attachments into individual items. If you don’t want them extracted, turn off the extract option before putting the document into this window. You can also manually extract attachments.6. Set Destination: Choose where the document will reside. The destination can be a Matter, a Contact or a Workgroup.7. Choose Document Type:
- You can select a document type for each document.
- If the document type doesn’t require additional information, the document will be catalogued automatically.
- You can also defer choosing a document type until later ("choose later"). 8. Upload and Process: Click "Upload." The upload window will minimise, processing items in the background. You can continue working while the documents upload. The "Delete original document(s)" will delete the document from its original location.


