Documents View
The documents view lists documents associated with a particular matter, contact or workgroup.
In the Desktop App, select Documents (or Precedents for workgroup documents) in the navigation pane of the relevant tab. The view is further divided into folders and sub-views, such as All Documents, Recent and Checked Out.
Document management is the final process in managing documents in a desktop application. Document management includes uploading, creating, and cataloging documents.
The below guide will explain the ways on how we can manage the documents into the system:
1. Getting Started
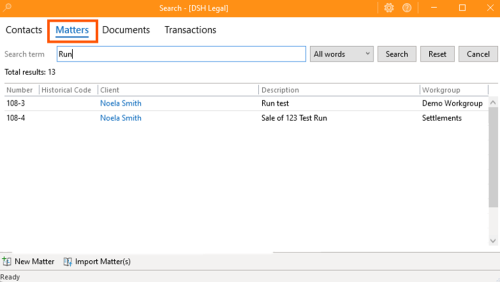
- Navigate to the ribbon group and click on Search
- Search for a Matter.
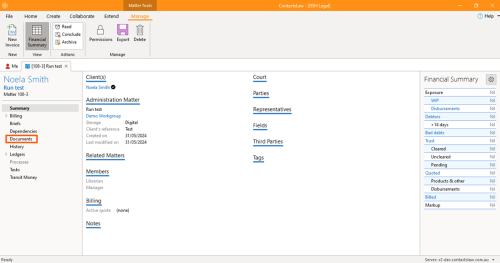
- Proceed to the pane and click Documents.
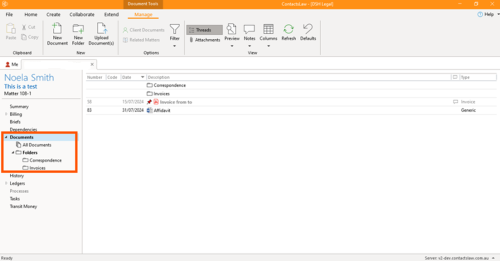
- Then you will be able to see subfolders in the same way that you would in Microsoft Windows File Explorer. Examples of subfolders include All documents, Correspondence, Invoices, etc. These subfolders are categorised based on the documents included within them.
2. Specify Options
In the ribbon group you may select your desired options for your document:
- Clipboard: This involves pasting, cutting, and copying documents from one folder to another.
- New: This option allows you to generate a new document from a template, create a new folder, and upload documents from the file system or Outlook.
- Options: This involves categorising client documents, documents that are related to matters, and filtering documents to hide attachments or replies.
- View: Includes threads of replies, attachments, preview of the document, notes, and customising of columns.
3. Context Menu
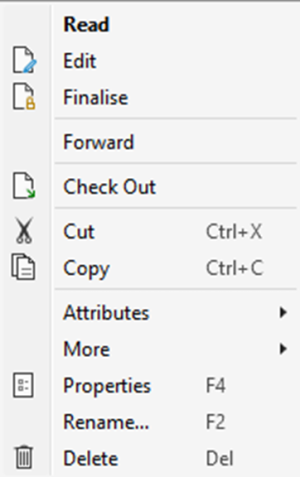
Context Menu is a series of commands that you can perform on the document. The contents of this menu will vary depending on the document and its category.
Select a document and do a right click:
- Read: It is the same with opening the document.
- Edit: Make any changes to the document.
- Finalise: To take the document that is in a draught state and mark it as final and that basically stops anybody else from making changes to it.
- Forward: Forwarding the documents through email.
- Check Out: Checking out is the third part of the basic processes. Full version control when you want to edit a document, you check it out, you go make your changes.
- Cut: Remove or delete the document.
- Copy: Copy the document from one document to another.
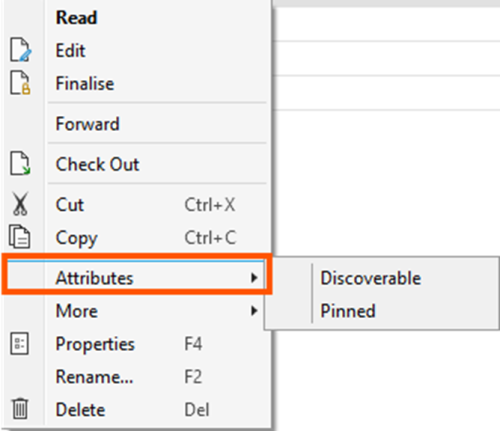
- Attributes: This option allows you to make your document discoverable by others in the system or to pin an important document to the top of the list.
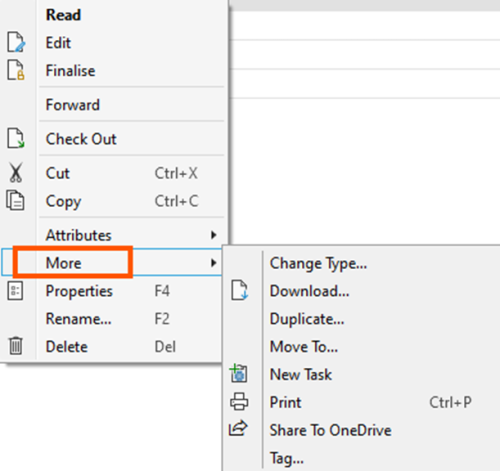
- More: These are the tangential options that you want to apply to your document. Options include changing the document's type or format, downloading, duplicating, moving it to another folder, creating a new task, printing the document, sharing it on OneDrive, and adding tags to it.
- Properties: This just opens the properties dialogue for that document where you can go and change all the particulars of that document and do edits that you want to.
- Rename: Renaming the document.
- Delete: Deleting the document.


