How-To:Debtor Receipt: Difference between revisions
(Created page with "This section of ContactsLaw provides an overview of the recording debtor funds that have come into multiple transactions. This structure ensures that financial records and transactions are organised clearly and efficiently for each business you operate. Debtor receipts are specifically used for recording payments to invoices that have been sent out. This article is similar to General Receipts, the difference is this time we will focus on the situation on how to find ou...") |
No edit summary |
||
| (8 intermediate revisions by 4 users not shown) | |||
| Line 1: | Line 1: | ||
This section of ContactsLaw | {{DISPLAYTITLE:How to Record Debtor Receipts}} | ||
This section of ContactsLaw offers an overview of recording debtor funds that have been received across multiple transactions. The structure provided ensures that financial records and transactions are organised clearly and efficiently for each business you operate. | |||
Debtor receipts are specifically used | Debtor receipts are specifically used to record payments made toward invoices that have been issued. While similar to [[How-To:General Receipt#3. Creating Debtor Receipts|General Receipts]], this article focuses on how to track and record the receipt of funds from debtors. | ||
The | The following guide will explain the steps to create a debtor receipt in the system: | ||
== 1. Getting Started == | |||
* Navigate ribbon group and click on Search. Then search for a Matter.[[File:Step 0 - Create Debtor Receipt.png|none|thumb|500x500px]] | |||
Proceed to a matter. (see the Create Matter guide) | * Proceed to a [[matter]]. (see the [[How-To:Matter|Create Matter]] guide)[[File:Step 1 - Create Debtor Receipt.png|none|thumb|500x500px]] | ||
* Proceed to view the group, drop down the billing and click on invoices.[[File:Step 2 - Create Debtor Receipt.png|none|thumb|500x500px]] | |||
* Go back to the Home tab, navigate to the ribbon group and dropdown on General Accounting. Proceed to Receipts and click on Create Debtor Receipt.[[File:Step 3 - Create Debtor Receipt.png|none|thumb|500x500px]] | |||
* As you can see, the editor window is identical to the [[How-To:General Receipt#3. Creating Debtor Receipts|general receipt]] except for the panel on the right side of the screen, which displays a summary of the Ledger balance for this matter.[[File:Step 4 - Create Debtor Receipt.png|none|thumb|500x500px]] | |||
== 2. Specify Options == | |||
2. Specify Options | |||
In the debtor receipt window, there are two (2) editor tabs that you need to fill up: | In the debtor receipt window, there are two (2) editor tabs that you need to fill up: | ||
Transactions: The information for this editor tab is similar to what you will fill up in the general receipt. | * Transactions: The information for this editor tab is similar to what you will fill up in the general receipt.[[File:Step 5 - Create Debtor Receipt.png|none|thumb|500x500px]] | ||
* When you input the amount data, the ledger will modify according to its calculations.[[File:Step 6 - Create Debtor Receipt.png|none|thumb|500x500px]] | |||
Allocations: This tab displays detailed information on the matter you are currently viewing. | * Allocations: This tab displays detailed information on the matter you are currently viewing.[[File:Step 7 - Create Debtor Receipt.png|none|thumb|500x500px]] | ||
* Review the details and click Save & Close.[[File:Step 8 - Create Debtor Receipt.png|none|thumb|500x500px]] | |||
== 3. Final Steps == | |||
3. Final Steps | |||
There is a way to confirm that the debtor receipt you create has been successfully processed in the system. | There is a way to confirm that the debtor receipt you create has been successfully processed in the system. | ||
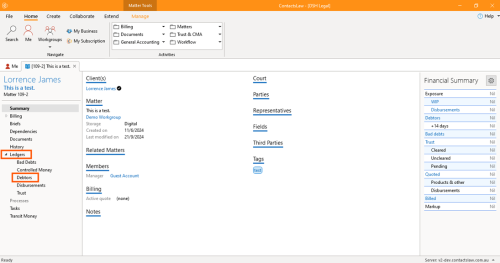
* Go back to the [[matter]]. Proceed to view the group, drop down the ledgers and click on debtors.[[File:Step 9 - Create Debtor Receipt.png|none|thumb|500x500px]] | |||
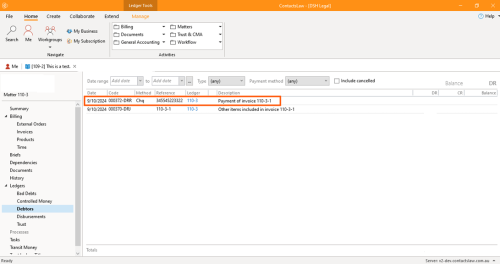
* Then it will display the debtor receipt created. However, because we only saved and closed the receipt earlier, it has not yet been processed, therefore it has no effect and does not change balance.[[File:Step 10 - Create Debtor Receipt.png|none|thumb|500x500px]] | |||
[[Category:How-To]] | |||
__FORCETOC__ | |||
Then it will display the debtor receipt created. However, because we only saved and closed the receipt earlier, it has not yet been processed, therefore it has no effect and does not change balance. | |||
Latest revision as of 14:53, 3 December 2024
This section of ContactsLaw offers an overview of recording debtor funds that have been received across multiple transactions. The structure provided ensures that financial records and transactions are organised clearly and efficiently for each business you operate.
Debtor receipts are specifically used to record payments made toward invoices that have been issued. While similar to General Receipts, this article focuses on how to track and record the receipt of funds from debtors.
The following guide will explain the steps to create a debtor receipt in the system:
1. Getting Started
- Navigate ribbon group and click on Search. Then search for a Matter.
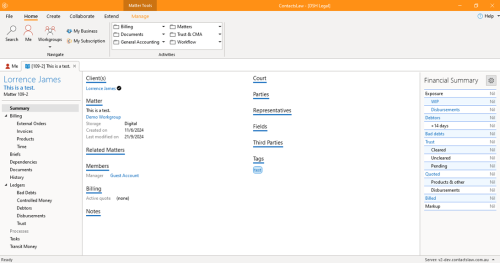
- Proceed to a matter. (see the Create Matter guide)
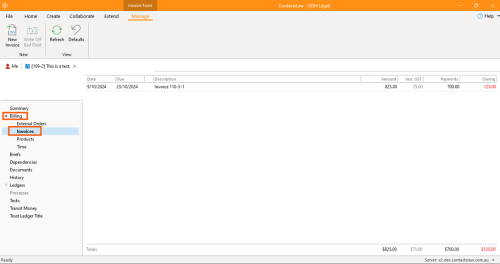
- Proceed to view the group, drop down the billing and click on invoices.
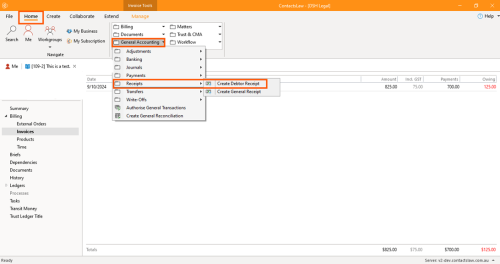
- Go back to the Home tab, navigate to the ribbon group and dropdown on General Accounting. Proceed to Receipts and click on Create Debtor Receipt.
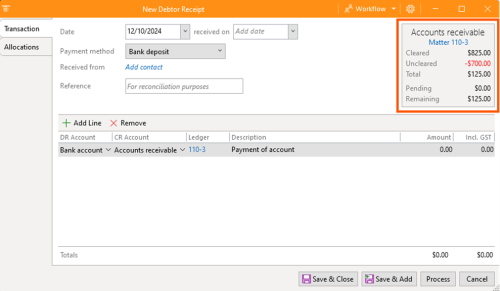
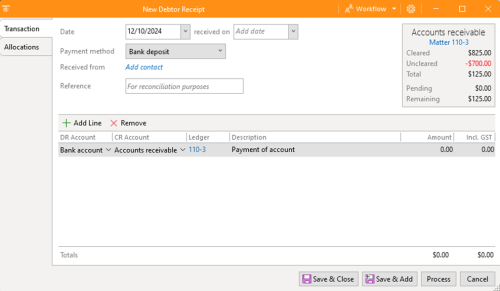
- As you can see, the editor window is identical to the general receipt except for the panel on the right side of the screen, which displays a summary of the Ledger balance for this matter.
2. Specify Options
In the debtor receipt window, there are two (2) editor tabs that you need to fill up:
- Transactions: The information for this editor tab is similar to what you will fill up in the general receipt.
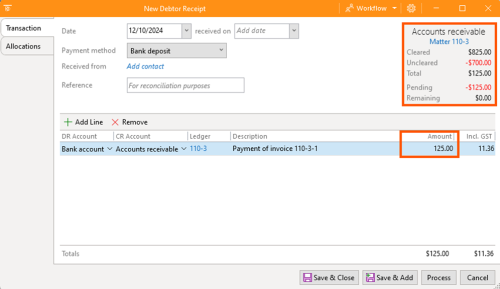
- When you input the amount data, the ledger will modify according to its calculations.
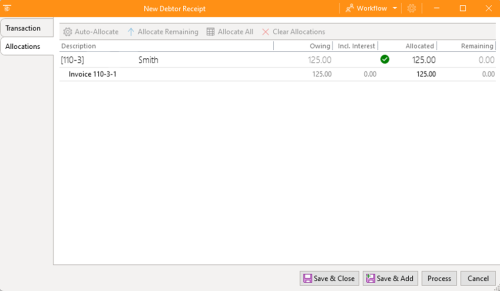
- Allocations: This tab displays detailed information on the matter you are currently viewing.
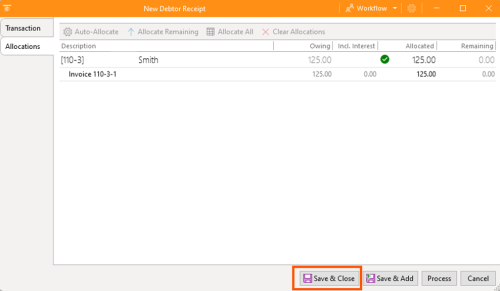
- Review the details and click Save & Close.
3. Final Steps
There is a way to confirm that the debtor receipt you create has been successfully processed in the system.
- Go back to the matter. Proceed to view the group, drop down the ledgers and click on debtors.
- Then it will display the debtor receipt created. However, because we only saved and closed the receipt earlier, it has not yet been processed, therefore it has no effect and does not change balance.


