How-To:Transit Money: Difference between revisions
No edit summary |
No edit summary |
||
| Line 1: | Line 1: | ||
{{DISPLAYTITLE:How to Record Transit Money}} | {{DISPLAYTITLE:How to Record Transit Money}} | ||
[[Transit Money|Transit money]] refers to funds (usually in the form of a cheque) which are held by law practices on behalf of clients and endorsed to third parties. This article explains how to record transit money in the [[Desktop App]]. | |||
This article | |||
== 1. Getting Started == | == 1. Getting Started == | ||
To record | To record transit money: | ||
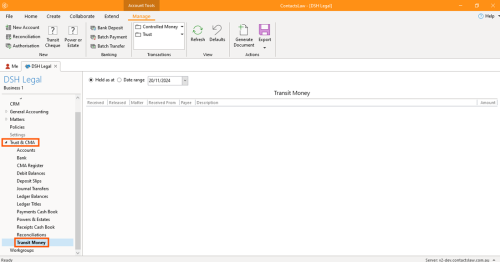
* '''Option 1''': Proceed to the ribbon group and click ''My Business''. | * '''Option 1''': Proceed to the ribbon group and click ''My Business''. | ||
[[File:Step 1 - Transmit Money.png|none|thumb|400x400px]] | [[File:Step 1 - Transmit Money.png|none|thumb|400x400px]] | ||
* Go to the ''Trust & CMA'' section and choose '' | * Go to the ''Trust & CMA'' section and choose ''Transit Money''. | ||
[[File:Step 2 - Transmit Money.png|none|thumb|500x500px]] | [[File:Step 2 - Transmit Money.png|none|thumb|500x500px]] | ||
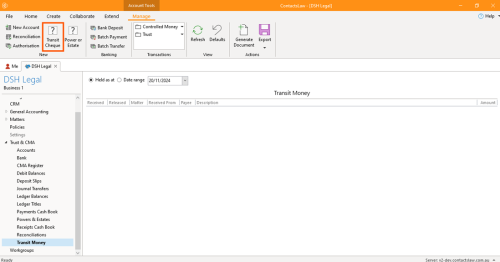
* Go back to the ribbon group and click on ''Transit Cheque''. | * Go back to the ribbon group and click on ''Transit Cheque''. | ||
| Line 38: | Line 35: | ||
== 3. Released Option == | == 3. Released Option == | ||
* After saving & closing the created money | * After saving & closing the created money transit, you will be able to locate it in the ''Transit Money Ledger'' and filter it according to the current date. | ||
[[File:Step 7 - Transmit Money.png|none|thumb|500x500px]] | [[File:Step 7 - Transmit Money.png|none|thumb|500x500px]] | ||
* Click the transaction, proceed to ''Status'' and you may change it from Held to Released which additional detail needs to fill up. | * Click the transaction, proceed to ''Status'' and you may change it from Held to Released which additional detail needs to fill up. | ||
Revision as of 23:36, 2 December 2024
Transit money refers to funds (usually in the form of a cheque) which are held by law practices on behalf of clients and endorsed to third parties. This article explains how to record transit money in the Desktop App.
1. Getting Started
To record transit money:
- Option 1: Proceed to the ribbon group and click My Business.
- Go to the Trust & CMA section and choose Transit Money.
- Go back to the ribbon group and click on Transit Cheque.
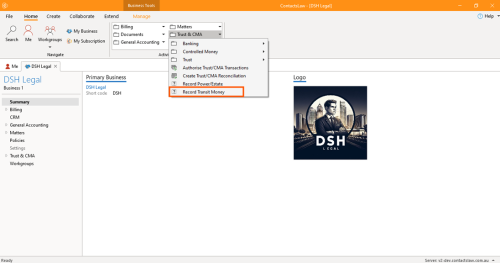
- Option 2: Navigate the ribbon group, click on Home and proceed to Trust & CMA.
- Dropdown the Trust & CMA section and select Record Transmit Money.
2. Specify Options
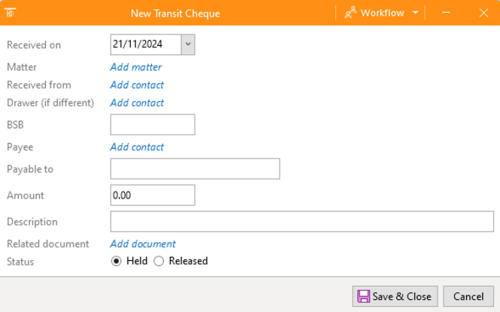
- Received on: This is associated with the Date.
- Matter: All transit money needs to be associated with a Matter.
- Received from: This option is associated with Contact.
- Drawer: Refers to a different person who the funds was received from which specifically a Contact.
- BSB: Bank Statement Number
- Payee: This option will determine who the money is going to specifically contact.
- Payable to: The name written on the cheque.
- Amount: State the exact amount of the transaction excluding the tax its GST.
- Description: Describe what the transaction is all about.
- Related document: This is where you upload the proof that certain transactions for clients exist.
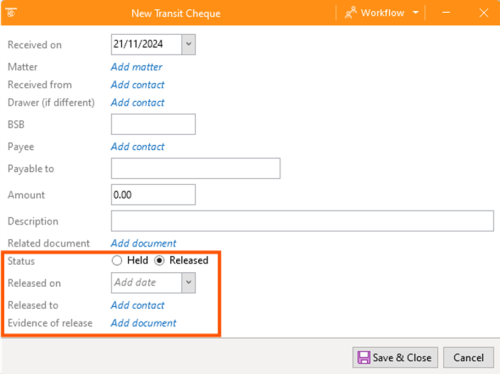
- Status: Currently, all transit money defaults to being in the status of being held.
- Review the details and click Save & Close.
3. Released Option
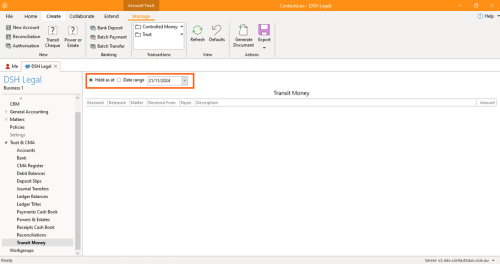
- After saving & closing the created money transit, you will be able to locate it in the Transit Money Ledger and filter it according to the current date.
- Click the transaction, proceed to Status and you may change it from Held to Released which additional detail needs to fill up.
- Released on: This is associated with Date when you released the money.
- Released to: To whom you released the money.
- Evidence of release: This is where you upload the proof that you released the money (e.g. receipt number or transaction reference number).
- Review the details and click Save & Close.


